Comprehensive WBaWC scoring guide
Author: RebotOva

Hello !
This is a guide for people who are interested and/or are scoring WBaWC. This will contain basic, beginner information to know how to get started, but also as much knowledge as I currently have of the game that is worth putting in a guide.
Please excuse any English mistakes, it's not my first language but I try my best.
Premise: I'm not the best WBaWC player in the world, but I believe I am competent enough to make a guide, better than nothing.
Quick paragraph list with no particular order, mostly just information dump, this is not supposed to be professional xd:
-
Table of contents
- Score gain
- Increasing PIV
- Characters differences
- Suicides for otters
- Hyper management
- Boss invincibility bug
- Duplication
- Linear Creature
- Dealing with token RNG
- Basic gameplay breakdown
- Bosses practice setups
- Random details
- Doing runs
- 8B run breakdown
- Random details
There are 2 main methods to increase score:
 Point items: these items have a value equal to the point item value (PIV) the cyan number displayed on the right side of the screen;
Note: Power items will give a score gain equal to point items if the power is maxed at 4.00!
Green items: released with various methods are worth 1/10 of the PIV. In the later stages, they make for most of the score gain, they are mainly meant to be the items that INCREASE PIV (more on that later) but once you hit stage 4 the number of bullets starts to make the score gain from them really important
Minor methods to increase score include the usual shooting down enemies and spell-card bonus (SCB)
As previously mentioned, PIV is increased when collecting green items, a green item is worth 5 PIV (while the counter shows the value increase by 10 at a time, in reality, it's actually 5)
There are 4 ways you can spawn green items:
 Otter hypers: these cute green otter spirits turn every bullet canceled into a green item, Otter can last for a long time and if correctly managed they can be used to milk the densest sections in the game, however, do not underestimate the other methods.
Shot: during any kind of hyper, hitting enemies with your shot generates green items. During stages 1 to 3, PIV from the shot is just as important as hyper cancels, while from stage 4 onwards it's not as important but it's still very relevant, the ideal is to try to hit as many targets as possible during your hyper to maximize gain.
Note: it doesn't have to deal damage, PIV is generated even when bosses have no hp bar for example.Spell and non-cancels: killing a non-spell or a spell-card turns every bullet left on screen into green items, optimizing cancels is ideal when possible.
Spirit strikes: manually breaking your own hyper by pressing the bomb button performs a spirit strike, an explosion that cancels bullets around you and turns them into green items, this is only used during penult spell and the final spell of Keiki.
Note: spirit strikes and hyper breaks are not the same, and explosions triggered by getting hit during a hyper do NOT turn bullets into green items.
Characters ranked based on score gain: Marisa, Youmu, Reimu. To understand the main differences I'll write a list of pros and cons:
Pros: highest PIV gains for focus and unfocus shot, fast movement speed allows for easier token management and easier dupes, bombs can be misdirected to avoid dealing damage to bosses.
Cons: Really slow movement speed during bomb makes collecting tokens hard. No homing or slash = harder stage portions.
Note: 1 laser generates more green items compared to 1 Rocket, when it's possible to hit all 4 lasers it's ideal to use them instead
Pros: fast movement speed during bomb is really comfy, slash allows for effective and effortless cancels, slash makes stage portions very easy, Really good for Mayumi's fight
Cons: lowest PIV gain for focus and unfocus, and she is forced to unfocus for PIV since slash gives very little PIV, bombs deals inconsistent high damage, slow movement is not good for tokens and dupes
Pros: there are no big pros to Reimu, which is why she is the worst, average PIV gain for focus and unfocus, homing makes stage portions a bit easier.
Cons: slow movement Speed, high damage bomb that kind of blinds the screen, and in general there is nothing she does really good in, she suffers a lot, not recommended.
Losing a life will spawn 2 static otters on death, as you can imagine 2 static otters are very valuable since you can guarantee easy hypers. Suicides are usually routed in a way to allow players to hyper patterns more than once.
The optimal amount of otters for a pattern depends on the pattern itself, the tankier the pattern the more otters you want in order to maximize scoregain. If the pattern doesn't have many bullets then saving some otters for denser patterns later in the stage is better.
Just shooting (doesn't have to hit anything) actually decreases the length of the hyper, touching enemies with otters spirits ALSO decreases length. This is important because shooting/touching enemies for the entire time, will actually cut the duration in HALF, however on most patterns, it's not bad because PIV from the shot is good and touching bosses is the optimal cancel spot, however, there are some exceptions to this (AHEM LC), just make sure you don't touch enemies with otters unless it's NEEDED.
A common strategy used during Kutaka, Yachie, and in general, let's say you are damaging Yachie while canceling, tokens move in from the bottom and left side, you move right to avoid tokens. This loses a decent amount of bullets unless you specifically wait for one otter to almost touch Yachie, move right-up, this counterclockwise movement slows down the otter on top of Yachie canceling mostly everything, learning how to do this often, can gain a lot of score while also cleaning the screen of bullets ofc, I suggest practicing this a bit.
Examples of counter spins:
Quick right-left counterspin movement like this is very useful in patterns like kutaka nons, can also help on Eika final.
A bug has existed since LoLK, if you bomb during the first second of a boss spell-card, the boss will become invincible for the bomb's duration.
Bombs are often used during patterns to safely collect tokens, doing this however damages the boss (especially Youmu and Reimu) and less health = less PIV from the shot, this bug allows players to bomb without worrying about bosses losing hp.
Duplication (often shortened to Dupe) refers to a glitch that allows the player to duplicate the releases of rare beast token hyper.
If you didn't know, every mid-boss, if a special condition is met, will release a special rare beast token, if you hyper using this token, at the end of said hyper, the usual 2 beast token release is switched with a 5 token release (depending on which rare token, the 5 releases can have random beasts, life pieces and bomb pieces)
HOW TO DUPE: when a hyper ends without breaking, 2 tokens are always released 2 seconds after the end, IF, during these 2 seconds, you can activate a new hyper with a rare beast token, the reward of the previous hyper will be switched with the reward of the rare beast token, the same release is then given at the end of the newly activated hyper, this effectively duplicates the reward of the rare token.
Why is this important? the reward is 5 tokens instead of 2, 1 of these is always 1 life piece. WBaWC normally gives up to  9 lives and 1 life piece, dupes can push this to 11 lives and 1 life piece, 2 lives are REALLY useful as you can imagine + the added 3 tokens come in handy to get a bonus hyper in the stage or make it easier to activate another one later on.
Note: if you are planning for 8 billion or less, it's possible to get it without dupes, if you really want to you could do 2 dupes, enough to get the 10th life, if you are going for Counterstop then I advise getting 5 dupes to get the 11th life.
Linear Creature (often shortened into LC or lines) is Keiki's third spell-card and is infamous for being really cool-looking, very juicy, and very hard to do. Why am I making an entire paragraph for just a spell? This spell if correctly executed gives between 1.7 to 1.9 BILLION score. Knowing how to correctly execute this, and making it as consistent as possible is important, because any kind of pace for a score you are trying to achieve, will be killed if you fail this spell. Here is how to correctly set up and execute LC.
Step 1: if you want to guarantee maximum score gain, you need 2 lives, suicide somewhere before LC (usually either 2nd or 3rd non) if you don't have two lives, you can still attempt LC but you will have to rely on luck to get maximum gain, which is something you don't want to risk. You want to bring the static otters into LC, 2 is ideal, 1 can work but it's a bit riskier but if you are forced to bring only 1 it's fine.
Step 2: get Keiki's third non's hp as low as possible, people usually just bomb, if you have dealt any kind of damage (including damage from death wave) you will have to miss direct Marisa's bomb, once Keiki is on low hp, active another bomb to enter LC. When you see lasers spawn, activate a 4-otter hyper, make sure to NOT use static otters if possible.
You want to enter with a  bomb to deal as much damage as possible without depleting the hyper meter (bomb damage does NOT deplete the hyper faster) this is because PIV from shot here is not worth losing hyper length, a longer hyper is waaaaay more valuable on this spell.
Step 3: Congratulations you correctly set up LC, now the hard part starts: survive the first hyper, try your best to AVOID STATIC OTTERS you will need them when the first hyper ends, while doing this try to deplete the rest of Keiki's hp bar now. the longer the spell goes on, the denser it becomes, so shooting now loses less score, + it's easier to focus because it's easier to dodge. get her low, but not too low you don't want her to die to your death wave after you suicide for the second hyper. speaking of the second hyper.
Step 4: You survived and your hyper has ended, 2 things can happen now:
- if you have static static otters on-screen, INSTANTLY suicide, quickly collect an otter hyper. Optimal hypers for LC are two 4-otter hypers, so for this second hyper, if you had only 1 static otter on-screen before suicide you can guarantee a 3-otter hyper, if you had 2 static otters you can get a 4-otter hyper. if you get a 3-otter hyper but you have consumed tokens that weren't static otters (there should be 2 of these spawned at the beginning of LC) then a 3-otter hyper is also pretty good.
- if you don't have static otters (either you didn't suicide before LC or you consumed them during LC) it's now up to luck, pray for the one beast token that is supposed to be on screen to become an otter right when you hyper ends, or wait for your release and CONFIRM it spawns either a wolf or otter before your suicide. 5/9 times it's an otter so optimal score gain assuming you consumed otters, if you spawn a wolf you will have to wait for about 2.5 seconds. if you spawn double eagles…… I'm really sorry for you.
Step 5: Survive the second hyper. wth no tokens to care for it shouldn't be too difficult, make sure you KILL Keiki, you don't want to time this out, you lose on a big cancel, and 3 tokens that you are gonna need for later. the ideal cancel is as late as possible during the last second, as Marisa, this is very risky, I recommend killing Keiki at like 4 seconds, if you are Youmu this is free so go for it.
Back up strat: a common strategy is to bring 3 lives for LC, this bonus life is used if you break the first hyper. with 2 suicides and 1 token on the screen you can spawn 4 tokens and still get a hyper, this is not optimal and loses score but it could save your run. I don't like this strat but I recognize it's viable
LC simulation in practice:
Notes: In a real run first hyper is usually activated with a bomb token dropped from spell 2, here I used a token dropped from non 3 which makes no real difference, just don't go for that (unless it's your only token) Here I tried my best to dodge 2 otters but you only need one so don't risk too much trying to dodge both if it might result in death.
Understanding token RNG, and learning how to deal with it is an essential part of learning WBaWC scoring. there are 2 sides: movement and tokens from releases, these are the only RNG elements
For movement there isn't much to say, this doesn't matter, it can make some sections comfy, and could make others uncomfortable or even straight-up harder, but nothing impossible, If you feel like you got fucked by token movement it was avoidable. for Dupes, as Marisa dupes are fine, In 110 hours of playtime I have yet to experience a failed duplication where I felt it was impossible. For Youmu and Reimu… I believe it can sometimes be IMPOSSIBLE to dupe, it's one of the big reasons why people usually don't score with them, but again this is unlikely.
For token releases it's a bit more complicated, here is a little analysis:
In an ideal world we would only get otters, but since we can't, the strats that are used accept otters as good/fine, but also  wolves as fine,
  eagles are harder to work with but you can make EVERYTHING work with eagles. a lot of otters tend to cause score gains, eagles tend to cause score losses, you would expect them to cancel each other out into neutral gain. that is not the case, RNG actually FAVORS score gains.
There are 9 possible releases
Otter-Otter
Otter-Wolf
Otter-Eagle
Wolf-Otter
Wolf-Wolf
Wolf-Eagle
Eagle-Otter
Eagle-Wolf
Eagle-Eagle.
we are gonna define "fine" as optimal/expected score gains, and "not ideal" as RNG that is not ideal and could make it harder/cause score losses.
For 1 otter: 5/9 times you get an otter so it's good, 5/9 times you get a wolf, which as we said is just as good, since having to wait a few seconds is EXPECT in normalized strats because you also often have to wait for tokens that were already on screen anyways, an instant otter is usually a score gain, wolf is fine, that leaves Eagle-Eagle as not ideal because having to wait that much is going to be a bit problematic. Overall it's a 5/9 chance for otter and an 8/9 chance of either otter or wolf.
Having to get more than 1 otter right after a release is not needed, getting more than 1 otter would be nice but not necessary.
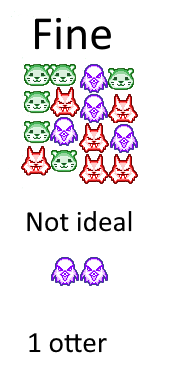
Conclusion: if you whine about bad token RNG, you are coping because statistically it actually helps you on average, eventually if you improve it should stop being a problem.
What is the basic gameplay plan in WBaWC? It can be broken down into 2 parts: the stage portions and the boss fights.
Stage: The stage portions game plan is straightforward really: it's important to memorize which enemies drop the tokens and which beast the enemy spawn (most of the time the beast dropped is static) and plan which sections to hyper get the timings down right for the activation.
Bosses: This is where it gets more complicated, you have a set amount of patterns that you want to hyper, you need to know the number of tokens you need to correctly hyper everything that you need entering the boss fight, if you have more than necessary, you can do two things.
- Leave the bonus tokens on screen, and consume them later into the fight, this can be helpful to get a new hyper ready because it's gonna be easier with more tokens, however, it's also true that with this game plan you will be forced into avoiding more tokens, which might force you in terrible positions to cancel/dodge.
- Consume the bonus tokens on screen early in the fight, the opposite of the first option, which removes the chance of later hyper activations being easier, but also lets you ignore a certain amount of tokens that you can freely consume while you focus on cancels and safety.
Bosses usually go like this: get a hyper ready for non 1, shoot down the boss, but leave some hp in the bar to keep milking with cancels, basic health management.
While doing this you also want to cancel at the best of your ability, and also manage tokens: track their movement to avoid consuming the necessary amount of tokens, and track their current beast timers.
Once your hyper ends, it's the hard part, pattern transition. You have 2 goals here:
- Prioritize timing your cancel to have the tokens you need, example: Your hyper ended, you see 3 wolves on screen, you wait 2 seconds for them to turn into otters before killing the pattern, never go into a new pattern without tokens ready, it's gonna force a bomb or a hyper skip.
Depending on the token RNG, you will have to adapt to it, if possible predict and hug some tokens in advance to time their otter state for the transition, failing transitions means you aren't tracking tokens well enough. - Only if the tokens allow it, go for optimal bullet cancel, same example as earlier: assuming the optimal cancel happens 3 seconds after the optimal time to cancel and collect otters, PRIORITIZE TOKENS, if the tokens and optimal bullet cancel align it's good, but it's rarely necessary.
Practicing boss fights can be very tiring, it's one of WBaWC's flaws when you compared its practice to other games. For realistic meaningful practice, you need tokens on screen. Players used to struggle with it, but in recent times some of us have come up with "setups" for boss fights, the fastest way to spawn all the tokens needed for practice.
Note: not all setups are perfectly realistic (same exact tokens) but all come pretty close, or at least as close as possible. most of those strats make use of suicides, make sure that you aren't losing too much power and use thprac's Infinite Power cheat if needed.
Also, do keep in mind that as usual the tokens that you may have entering each boss are different depending on your route, make the modifications you may need to the setups.
Start from second half 2, with a  jellyfish hyper active (make it short hyper, like wolf otter eagle wolf or something) when it ends, suicide twice, make sure to only collect the 4 static otters spawned from the suicides, at this point if you killed every enemy (just bomb the last three fairies) you should have 10 tokens on screen (7 beasts 3 fishes) and 4 otters in bar, this setup is just 1 beast of from being perfect.
This is assuming a dupe, if you are doing dupeless, you can just consume a beast during dialogue.
Start from second half 3, with a  horse token hyper active (short). When it ends, suicide once, collect the 2 static otters. If you spawned every single token, start 4 otters with a life piece on dialogue, you should have 4 beasts 1 fish on screen.
For dupeless: use a  cow token, and suicide twice instead, 4-otter hyper using all 4 statics, and consume 1 beast during dialogue. Both of those are perfect simulations.
Start from second half 3, with a horse hyper active (short) when it ends, suicide twice, make sure to only collect the 4 static otters spawned from the suicides. Make sure to bomb the last fairy section and spawn  5 point tokens. at this point you can start a 5-otter hyper during dialogue, consume the
  life token, and you will have a PERFECT simulation.
For the dupeless setup, use a cow token instead, and don't consume any tokens. this one can perfectly replicate the hyper skipping that you would do on kutaka spells in the 8B reference replay.
Yachie fight with dupe implies otter duping  turtle, meaning we start from midboss:
2 otters 1 fish token in bar, suicide once, leave the tokens on screen. spawn the turtle token at the usual 5 second ish mark. from there the simulation of turtle dupe is perfect - a missing fish token.
Dupeless: start from second half 2, 2 otters 1 fish 1 turtle in bar. Suicide once, once dialogue starts, start at 3-otter hyper and consume 1 beast, you should have 3 beasts on screen, (normally 2 beasts 1 fish, but you also normally have a 4-otter hyper, we moved the fish from the screen to the hyper) almost perfect.
Currently the WR run doesn't dupe so it's just one simple setup:
Start on second half 2, with a cow token hyper (short). Just bomb when the hyper ends to kill all the faires, start a 5-otter hyper on dialogue and you have a perfect simulation.
Keiki practice requires having token on screen, meaning mid-boss start:
Start with 4 tokens in bar (tokens irrelevant) suicide thrice. Use one of the 6 otter tokens to hyper, break it and spawn horse. at this point you would suicide again, collect 3 static otters and 1 fish token. Activate hyper with another fish on dialogue, and with that, you should have 4 beasts 4 statics 1 horse on Keiki, perfect simulation.
Dupeless: same exact setup, just instead of starting hyper with 3 otters 2 fish, you do 3 otters 1 fish and 1 horse.
A series of random details that don't really fit anywhere so I'll just list them here:
- Point and Power tokens drop 30 items each.
- A token once first spawned takes 4 seconds to switch beast, after the first switch every subsequent one takes only 3 seconds, (this next detail was kind of hard to test but it looks like): if a token is hugged, its current timer is pushed back by roughly 1.5-1.75 seconds, up to its maximum duration (4 or 3 depending on the number of switches)
- Did you know that Marisa's PoC line is lower compared to Youmu's and Reimu's? Not only that but it's not as high as you might think, This PoCs… kinda weird but yeah

- Tokens have a lifetime of 02m10s, after this time they will turn gray and despawn after around 15 seconds. they can bounce as long as these 15 seconds don't end, once it reaches 15 seconds the token will just fly off the screen instead of bouncing.
- Unlike UFOs, hugging tokens does not freeze their life timer.
- Dying causes a small amount of damage to be dealt to every enemy on screen, this is called "death wave", Reimu deals less damage with her death wave.
- 3 Otter spirits during a hyper always spawn in the same position, bottom, top right, and top left
- When you die and respawn, it's possible for a token to touch you when respawning if it's low on the screen, make sure you don't suicide if a token is moving in the respawn point
- It's common practice for players to pause during boss dialogue to take a look at where tokens are on screen, characters' portraits hide the tokens…
This is the section of the guide where I explain the strategies that are used. we will be talking about Marisa because she is the best and most common shot.
I will show the current World record from stages 1 to 6 and explain by voice the strategies used. I will then write down tips and suggestions for lower-level scoring. keep in mind that the suggestions can still be hard to work with, and I don't feel like giving more tips than that, because at that point the routes would become extremely specific and you might as well work on your own route that you find comfortable, using the knowledge that can be learned here.
I also recently added (can be found below the world record run breakdown) my commentary of an 8B run sample made by player MyonKT, of a run that makes use of very consistent and safe strategies. Before I can do that though I have to talk about one thing.
Stages 4 to 6 follow a very similar resource route (bomb usage, suicide spots, etc) in most kinds of runs, However, stages 1 to 3 may have a very different resource route depending on your preference.
The important thing is knowing that you want to enter stage 4 with 3/4 bombs and don't lose more than 2 lives. once you know that, you can start choosing where to bomb in stages 1 to 3. Usually, players follow one of these 3 options: 1: stage 2 suicide 2: Kutaka suicide 3: no suicide before stage 4.
1 this option allows for easier stages 1 2 3, dumb 4 bombs into stage 1 and suicide on stage 2 to replenish bombs and bonus tokens for a bonus hyper, and gives you lots of bombs for stage 3. Ofc this loses 1 life so it's not the best but it's the basic route.
2 Most players think this is a bad idea and I can see why, however in my personal experience for me, this has worked best. you trade for a harder stage 1 2 and 3, But Kutaka's fight itself is easier if you can suicide somewhere on it, even if option 1 gives you more bombs.
I would always make a mistake somewhere on Kutaka back when I was doing stage 2 suicide route, and it would fuck me up badly, this route allows that mistake, score gain was about the same so I wouldn't worry about that.
3 This leaves the third option which is just getting good and don't suicide to replenish bombs, hold enough bombs for the entirety of stages 1 to 3. As you can imagine this makes said stages much harder to execute correctly, the reward of a bonus life into the later stages is worth it but not for lower level scoring, I suggest using this only for CS+ runs.
If you can't keep up with safety and need more bombs, you could allow a suicide in both stage 2 and 3. However do keep in mind that going 2 lives behind will lose a good chunk of score in the late game, but as a beginner, it's worth it if it increases the number of runs in the late game.
With all of that said let's talk about stages:
Notes for lower level: spawning the jellyfish token can be hard and a bomb is commonly used to make it consistent, you might what to consider using that bomb.
- Activating the first hyper can also be just as annoying, I have seen some replays use a bomb here to clear the blue fairies and make the hyper activation consistent: both of these bombs have been used by WEF in his Counterstop run linked here (use this for visual/audio queues reference):
- Jellyfish dupe is not really needed for scores below 8B, especially if you are planning to dupe in stages 2 and 3, the only thing it changes is missing on the life pieces (not needed assuming 2 dupes later) and 3 tokens, which get consumed anyways during spell 1 non 2 and final, this means you don't lose any hypers. Ofc if you go for the bomb to make first hyper consistent you might as well go for the dupe at that point.
- 3 power into Eika boosts PIV gain by a decent amount but it's not needed for even CS pace.
- Both bombs used during Eika's first and second non are not mandatory and can be avoided if, after practice in stages 2 and 3, you realize you need more bombs, you can give up on 1 or both bombs there.
Notes for lower level: I highly recommend not sticking to the top side of the screen during the first hyper to spawn cancel, as soon as it gets dangerous just move down, killing at least 3 fairies is the priority here.
- Right after the first hyper is where the suicide happens if you are going for stage 2 suicide, doing this adds 2 more tokens, with them it's possible to do one hyper on every single one of Urumi's attacks and still end up entering stage 3 with 3 tokens (all of this assuming you don't consume any token)
If you aren't doing the suicide route, I highly recommend bombing right after the first hyper, as you saw getting 4 otters ready for Urumi mid-boss is really hard without a bomb. - I have seen people use a bomb right after the hyper that dupes mid-boss, I personally don't think it's that risky to do the section, bombing allows for PoC (not that worth it this early) and easy token collection, I think token collection is easy. If you really do find it hard here, I guess you could consider bombing.
- If moving away from Urumi bothers you when doing non 1 and 2, just stick to dealing damage quickly and then move away, once she is low you can just spin when she shoots, you lose a really little amount of PIV and if moving in and out makes you uncomfortable it's ok to give up on this movement.
Notes for lower level: activating the first hyper can be really scary tokens don't move down, you might be forced to collect them early. If you do that the hyper will end too quickly in the mentos fairies section while they are still alive and shooting, you might have to bomb if this happens, you can't afford to go behind in token collection to dodge here.
To avoid all of this, if you collect the tokens for the first hyper early, just wait down without shooting until fairies don't move down in otter rage, this loses some PIV but might save you when the hyper ends.
- The second half of the stage is really weird, if you can't consistently replicate what Borealis does, feel free to experiment with different bombs and different hypers, just make sure you do only 2 neutral hypers (3 if you count the neutral that dupes) and like 2 bombs, you could use more bombs but that depends on if you can do Kutaka while still entering stage 4 with 2/3 bombs and 2 pieces. I will show an example of my stage 3, which might be a good reference for a different approach.
- Don't take too many risks when doing the first non, IT'S REALLY SCARY, move away if you don't feel safe and then move back in slowly, this loses PIV but it's better than breaking a hyper.
- Activating a hyper in time for spell 1 non 2 and 3, can be hard, you might want to consider bombing some of them if you can't hyper in time.
- If you fear doing spell 2 with a neutral, you can use a 3-otter hyper too, not ideal but it's better than breaking a hyper.
- The final spell has many different approaches, you could kill it like Borealis does, but wisps shoot a lot so it's scary, you could time it out, but with tokens on screen, it can still be hard + you lose items dropped, you could bomb… But that uses a bomb so you wouldn't want to do it if you are short on bombs. Choose your poison.
Notes for lower level: If unfocusing during stage sections with ying-yangs that shoot RNG bullets is too risky for you, I would just avoid it and focus, the PIV gain is more relevant for CS+ paces…
- Now the suicide showcased in the stage section is really unique and I would avoid doing it like that, the usual comfy routes do: assuming you enter stage 4 with 2/3 bombs and 2 bomb-pieces: bomb ying-yang spams after hyper, and bomb both pink and red wisps before mid-boss, if you enter with just 2 bombs and 2 bomb-pieces, give up on the bomb for pink wisps, as it's the section that loses the least score and it's also easy to survive in. After you do this, hyper mid-boss as usual, suicide after the hyper AFTER to tokens spawn (gives more time to think and avoids accidental spawn collection) use Iframes from death to easily graze and spawn the turtle token. example of this route:
- I would avoid duping the turtle token entirely, for lower scores it's just not worth the effort, (bomb pieces route doesn't get messed up if you don't dupe, because the only tokens that drop bomb pieces are the cow and
 the chick, so don't worry about that). If you decide to try to dupe, then I highly recommend saving both static otters for this part, if you do that, you will have to get a 3-otter hyper instead of a 4-otter hyper for the second hyper of the stage, minor PIV loss for a much easier dupe (4 otters with correct setup, really comfy).
 - Borealis' route for Yachie makes sure he can enter stage 5 with 3 tokens, this is a strategy that is needed for stage 5 and I only recommend for 11B+, you can afford to consume one more token during the first spell this way, just make sure to leave at least 2, or if you want that bonus token to hyper more easily later during the stage, than go for it, just make sure you don't break hyper on the first spell while trying to avoid tokens…
Bonus video about how to correctly optimize spell 1
forgot to add: right is optimal because moving from right to left cancels more bullets (left to right makes otters spin slower and loses bullets often)
Notes for lower level: as said in the stage 4 part, I highly recommend entering with 2 tokens and not 3. Doing this you have to skip the second hyper, this is because you WON'T have enough tokens to activate the second hyper in the first place. Why would you do this? Simply because the setup to do a 5-otter hyper after mid-boss is waaaaaay harder to do if you go for the second hyper before it, second hyper gains 100M at best, I only suggest doing this for CS/11B + paces. Forgot to mention this: The RNG spam section drops 2 eagles, by the time Mayumi mid-boss dies these 2 eagles will be either otters or wolves so it's veeeery consistent with the basic strat, example here:
- During green kunai, focus on the haniwa as much as you can, consuming too many tokens is not ideal but it's only a minor score loss, consuming the haniwa can be catastrophic.
- All Mayumi nons can be extremely scary, pay really close attention, and make sure you are confident on getting good cancels on them.
- I highly recommend doing the first spell at the bottom of the screen, this usually loses less than 50M, but the center strat is really fucking hard and unnecessary for low level.
- I would maybe avoid shooting Haniwa soldiers during the third spell, the score gain isn't that big and you might risk killing Mayumi prematurely.
- Activating a 4-otter hyper right in time for the third wave of the final can be very hard, you might want to activate it on the second wave if you see the chance, you could also try moving down to collect tokens, this deals more damage to Mayumi so tiny scoreless but it's good for safety, just make sure you can still kill the top haniwas. Maybe avoiding this execution entirely could be better. you can save 2 bombs, and just hyper at the beginning, gains probably like 100M or 150/250M.
Notes for lower level: the first hyper is usually activated during mid-boss dialogue, if you go for the early hyper make sure to practice it a lot to avoid having to consume a token.
- During the second half of stage 6 prioritize not accidentally activating a hyper, maximizing score gain while dodging tokens is very hard here.
- I would avoid duping the horse token entirely, this duplication is so hard and unpredictable, do 2 hypers and not 3.
- feel free to 4-otter bomb at the beginning of both first spell and second non if you can't hyper in time, suicide to setup static otters for LC can happen from non 2 onwards, and unless you made a weird route you should have enough bombs to do Square Creature
- lose 0 tokens during Keiki and you COULD do Non 2 and spell 2 without suicides, and then suicide on non3, but even in this case it can be good to suicide early in non 2, for example, you need Iframes to wait for otters and instead of bombing you suicide. if you lose 1 token then you are forced to suicide on non 2 and also collect 1 static otter. if you lose 2 tokens then you would be forced to collect both static otters and do LC without static otters… just skip the second hyper on non 2 in that case.
- Refrain from canceling 4th non without a bomb, that shit snipes you waaaay too fucking easily.
- I definitely would avoid doing oni-shaped creature in the middle of the screen, it is static but it's still very scary and it's an optimization that I would only use for CS+/11B+ scores.
- ID is a very hard spell to optimize, for low scores I would aim for around 750M gain, if you are confident to go for something higher you can do it, but it's probably not needed.
Notes about this run: This run features 0 dupes, many hypers are skipped on boss fights to avoid non to spell transitions and vice-versa. A total of 9 lives, 1 of which is not routed to be intentionally suicided anywhere but is instead used as a safety for a possible comeback following a mistake in the later stages (in this run it was used as a comeback on Linear creature after first hyper was broken). If you feeling comfortable doing 2 dupes somewhere, you will be able to increase the number of safety lives from 1 to 2.
Replay download: https://cdn.discordapp.com/attachments/986054135424102470/1038844476782825472/th17_25.rpy
Thanks for reading, I don't really have much more to add.
Have a cute otter video to cheer up if you are having a bad day.
Video made by Aty: youtube channel for the cutest otter in existence, you might wanna subscribe…..
Thank you for checking out the guide written by RebotOva !
Here is the link to the original guide: https://rebotova.blogspot.com/2022/02/comprehensive-wbawc-scoring-guide-wip.html