Wily Beast and Weakest Creature - Extra RTA guide
Author: Nylilsa
This guide focuses on speedrunning the Extra stage of Wily Beast and Weakest Creature (often abbreviated to WBaWC).
Furthermore, this guides assumes you know the basics of the game, such as but not limited to the controls, game's objectives, bombing/dying, Youmu as shottype, and the game's items. Though, I will revise the token system
WBaWC has a special gimmick that is about tokens and hypers. Tokens are dropped by some stage enemies and bosses, and they are also dropped if the player dies. If the player collects 5 tokens, then the player triggers a hyper.
If you pick up a token during a hyper, then the duration of the hyper is extended and, depending on the token you picked up, you may get some items as well (more on that later).
[image]
Above is an image that has all tokens in them:
There are the animal tokens , which are the [match=Wolf], [match=Otter] and [match=Eagle] tokens. Those animal tokens change state after some time, which is made visible by their blinking outline They start blinking 45 frames before they are about to transition.
[match=Otter] to [match=Eagle] to [match=Wolf] to [match=Otter].
Some of them have a red/blue outline. This means that they are not mutable. Those tokens only appear if you die or if you are on Stage 6 of the game, but it's not too relevant because we are doing Extra !
If you are close enough to the tokens, you'll notice that the tokens become a lot slower. Not only do they become slower if you are nearby, they'll also stop changing states ! But this is slightly different from how UFO handles its tokens.
You see, in UFO, a mutable UFO token has a hidden timer that counts to 0. If the counter hits 0, then the UFO changes colour. If the player is close to a mutable UFO token, then that counter pauses. The counter resumes the moment the player is far enough from the token, so it's possible for the token to change colour the frame the player leaves its radius.
In WBaWC, a mutable animal token has a hidden timer that counts to 0. If the counter hits 0, then the animal token transitions into another animal token. If the player is close to a mutable animal token, then that counter not only pauses, but also gets set to 60. This means that if the player is not close to the token anymore, then it is impossible for the mutable animal token to instantly mutate, unlike in the case of UFO. This can be used to your advantage to manipulate as many different tokens as possible at once, but more on that is discussed later.
Then there are the item tokens which have the blue fish around them.
If you timeout or break a hyper that has an item token in it, then you will get its items. Also, if you pick up an item token during an active hyper, then you instantly get the items. Below I describe all the
- If you pick up a power item token, then you get 30 power items.
- If you pick up a point item token, then you get 30 point items.
- If you pick up a life token, then you get 1 life piece.
- If you pick up a bomb token, then you 1 bomb piece.
(yeah its kinda false advertising for the life and bomb tokens, because you'd expect to get a full life/bomb based on the image you're shown xP)
Lastly, there are the special tokens. The special tokens have a yellow glow to them. Only one of those tokens can be gotten every stage, so for Extra you can only get one of the tokens.
If you have a special tokens during a hyper, then the hyper gives you 5 tokens in return instead of 2.
When collecting 5 tokens, the player activates a hyper. A little bar appears beneath the player. If the bar runs out, then you get 2 or 5 tokens in return. If you get hit or if you try to bomb during a hyper, then the hyper is manually broken, which clears some bullets around the player and gives you some invincibility. Also, if you shoot during the hyper, then you will get PIV or Point Item Value. This is related to score, and since score is not relevant when speedrunning I won't go into much detail about it.
If you pick up 3 animal tokens of the same type, then your hyper has a special ability. This differs per shottype and per animal token.
Also, the special hyper's duration is affected by your shottype. For example, if Youmu[match=Otter] has 3 [match=Wolf] tokens in its hyper, then the hyper's duration is very short. But if Youmu[match=Wolf] has 3 [match=Wolf] tokens in its hyper, then the hyper's duration is longer than Youmu[match=Otter]'s.
Below I describe the different special hypers.
The [match=Wolf] hyper focuses on single-target damage.
Reimu: Reimu shoots powerful needles that is good for single-target damage.
Marisa: Marisa shoots very large missiles that have a lot of Area of Effect damage upon explosion
Youmu: Youmu's [match=Wolf] hyper is like 4-power Youmu[match=Wolf]'s charge shot is: she shoots 8 slashes that have a long reach and the slashes are instant, but the slashes deal less damage than the regular shot.
The [match=Otter] hyper is very simple. When you have an [match=Otter] hyper, there are three [match=Otter]s that spawn around you and that rotate counter-clockwise. When bullets touch the [match=Otter]s, the bullets are cancelled and turned into score. The [match=Otter]s deal very little damage to an enemy. This hyper is the same for every player character.
The [match=Eagle] hyper focuses more on Area of Effect damage.
Reimu: Reimu shoots very large homing amulet bullets that deal a decent amount of damage.
Marisa: Marisa shoots 5 large powerful piercing laser beams that also deals a decent amount of damage.
Youmu: Youmu's [match=Eagle] Hyper shoots out small waves from where Youmu is at that deals a lot of damage when up-close.
(also, the beast should reflect on the shottype's spirit animal, so Marisa[match=Wolf]'s performance is better on a single target due to strong missiles, whereas Marisa[match=Eagle] is better on stage sections due to its better lasers.)
That should cover the main mechanics of tokens and hypers !
I will first distinguish between the best player character, then I will tell about the best spirit animal.
There are three character you could choose from: Reimu, Marisa and Youmu.
There are a number of factors I take into account when determining the best shottype in WBaWC. The factors go as follows:
- The shottype's average Damage per Second of the shottype (abbreviated to DPS);
- The shottype's Bomb;
- The shottype's [match=Wolf] and [match=Eagle] hypers.
When comparing the DPS on a boss, it's found out that Youmu is the best shot for DPS.
Below, I summarise the best results per shottype of the video
with no-hyper:
| Spirit | Reimu | Marisa | Youmu |
|---|---|---|---|
| [match=Wolf] | 17.13s | 16.00s | 11.56s |
| [match=Otter] | 20.56s | 18.78s | 10.10s |
| [match=Eagle] | 19.05s | 17.75s | 12.25s |
Youmu[match=Otter] is the strongest shottype assuming no hyper is used.
with [match=Wolf] hyper:
| Spirit | Reimu | Marisa | Youmu |
|---|---|---|---|
| [match=Wolf] | 11.78s | 12.65s | 10.01s |
| [match=Otter] | 11.78s | 12.65s | 10.01s |
| [match=Eagle] | 11.78s | 12.65s | 12.70s |
Youmu[match=Wolf] and Youmu[match=Otter] are the strongest shottypes with their [match=Wolf] hyper. The reason why Youmu[match=Eagle] doesn't do as well is because of a bug
with [match=Eagle] hyper:
| Spirit | Reimu | Marisa | Youmu |
|---|---|---|---|
| [match=Wolf] | 14.80s | 12.15s | 9.88s |
| [match=Otter] | 14.80s | 12.15s | 9.88s |
| [match=Eagle] | 14.80s | 12.15s | 9.88s |
Youmu[match=Wolf], Youmu[match=Otter], and Youmu[match=Eagle] are the strongest shottypes with their [match=Eagle] hyper.
Conveniently, Youmu[match=Otter] has a much stronger bomb, and she spawns with 4 bombs in stock instead of 3 bombs. Since Youmu[match=Otter] deals the most damage with an active hyper and without an active hyper, she is the best damage shottype.
I will distinguish between three different rankings: Beginner, Intermediate and Advanced
The strategies and routes I provide will be categorised based on the three aforementioned rankings.
If you are a beginning player, then I recommend to aim for a speedrun that lasts between 6m30s and 6m00s.
If you are an intermediate player, then I recommend to aim for a speedrun that lasts between 5m59s and 5m40s.
If you are an advanced player, then I recommend to aim for a speedrun that lasts less than 5m40s.
Beginner
Due to a bug, Saki takes damage when bombing during her Survival spell-card. You definitely want to bomb as you will skip an entire 90-second long spell-card with this.
Beginner
If you bomb before a spell-card starts, the boss is able to take damage. In Extra, this can only be done on Kutaka's 2nd and 3rd mid-spell-cards.
Beginner
In TD and WBaWC, if the player holds Shift, then Youmu's options retract.
In TD, if the player then releases shift, then the options to back to where they were previously.
In WBaWC, if the player releases shift, then the options are right above Youmu.
There are cases where you will be running across the screen collecting tokens during a bomb. Your options will be all over the place, and they may not be under the boss. In such a case, it is important to periodically press shift to retract your shot's options to deal as much damage as possible.
Intermediate
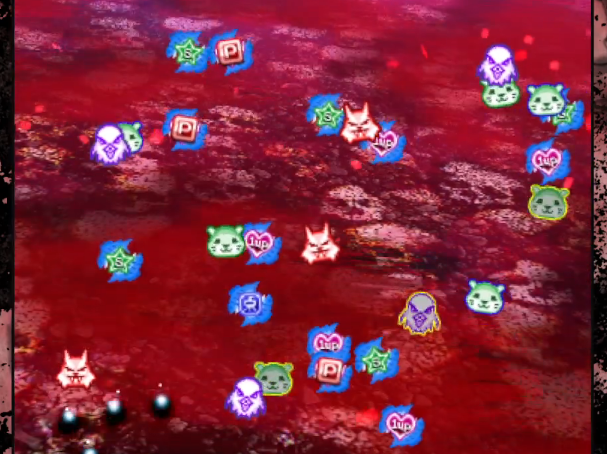
Yeah, that's a lot of tokens to deal with, and there are actually runs where there are double the tokens on-screen!
So, how do you deal with all the tokens on-screen?
Well, it's simple. You get better with it through experience.
Though, there are a couple of tips I could give you with dealing with token management.
- Be comfortable with their hitboxes.
Go around the tokens and try to dodge them like bullets. There are often times where you may have to squeeze through two tokens you are trying to avoid. It is best to learn the hitbox of the tokens so that you know how to avoid them or when to pick them up. This is the most important skill when dealing with tokens in my opinion.
- Know the cycles of the animal tokens.
[match=Otter] -> [match=Eagle] -> [match=Wolf] -> [match=Otter] -> [match=Eagle] -> [match=Wolf]
- Manipulate the animal tokens.
Sometimes, there is a dominant animal token on-screen (i.e. there are only [match=Eagle] tokens on-screen). This can be very annoying since you would have to wait for a few second before picking up your preferred token in case you are unlucky. In this case, you want to stay close to some tokens and make sure there is a healthy mix of animal tokens on-screen.
Intermediate
Actually, you can also deal bomb damage to Saki's final spell-card too ! There are two ways in which this can be done.
- Bomb before the spell-card starts.
Saki will be invincible for 90 frames, but then you are able to damage her normally.
- Bomb 60-89 frames after the spell-card starts.
This is more tricky. If you decide to do this, Saki will only be invincible 60-89 frames after the spell-card starts. This effectively means that bombing later results in your bomb lasting for 1.5 seconds longer than if a bomb were used before the spell-card starts.
Intermediate
Although mostly used in scoring, it is possible to do it in Extra as well. Though for this to be done, you must get the special token from Kutaka midboss.
This is a bug that involves tricking the game into you having a different token state.
When timing down a hyper while having a special token, the player is rewarded with 5 tokens instead of 2 tokens. There is a brief period between not having any tokens and the 2 or 5 tokens spawning. However, it is possible to be rewarded 5 tokens without timing down a hyper with a special token in your inventory !
Firstly, you must activate a hyper that would normally reward you with 2 tokens. Then, once the hyper is timed out, there is a brief period in which you can grab additional tokens before you are rewarded with 2 tokens. In that brief period, you want to activate a hyper with a special token. If done correctly, you should be rewarded with 5 tokens instead of 2 tokens. (It is possible to do it the other way around where, instead of getting 5 tokens, you get 2 tokens.)
Though, this trick is not necessary in Extra whatsoever, as you are given enough bombs. Also, you don't want to capture Kutaka's third spell.
Advanced
This trick involves duplicating Youmu's [match=Eagle] hyper for 39 frames. The setup is as follows:
- Be one token away from activating your [match=Eagle] hyper.
- Charge your slash.
- (optional) Release your slash by releasing the Z key.
- (Quickly) get the final token to activate your [match=Eagle] hyper.
Now, there are two [match=Eagle] hypers on-screen: one where the slash was released/where the token was picked up, and one where Youmu is at. Essentially, the game treats your slash as a place where it can spawn the [match=Eagle] hyper.
This trick is hard to set up when speedrunning, as you pretty much need to activate the [match=Eagle] hyper on top of the boss. This trick can save about one second per attack if done well.
[[match=Eagle] hyper break]
Advanced
When breaking an [match=Eagle] hyper intentionally, you can see a few slashes spawning in front of you. Those slashes aren't purely visual, but they also deal a lot of damage !
An intentional hyper break maybe quite difficult to do at first because you may be very used to timing them down and getting tokens from them. If you struggle with having enough tokens on-screen, then please timeout the hyper to guarantee 2 tokens during the run. If you are more comfortable, then the hyper break is great to shave off 1s per attack.
However, it is not as simple as breaking the hyper.
- The hyperbreak has to be timed.
You want to make sure that the hyper break ends the spell-card you are currently facing. Often times you may end uo breaking it too late (not saving time) or breaking it too early forcing you to finish an attack without a hyper active, which is slower. - You may be at risk of an annoying glitch that instantly kills you, losing up to 2 entire seconds (this can be avoided by not manually breaking the hyper, but instead by getting hit).
[[match=Wolf] hyper break]
Advanced
Breaking a [match=Wolf] hyper is similar to breaking an [match=Eagle] hyper, but breaking a [match=Wolf] hyper well is slightly more difficult to do.
When breaking a [match=Wolf] hyper, Youmu may spawn a number of slashes, similar to how Youmu[match=Otter]'s focussed slashes are. How the slashes spawn depends on when you break the hyper.
Take the following image:
(youmus with [match=Wolf] hyper at different times with numbers next to slashes)
Basically, you want to break the hyper if the number is green. This ensures she slashes another wave.
Keep in mind, the white slashes of Youmu[match=Otter] deal more damage than the red slashes of the [match=Wolf] hyper.
Again, there are some things to look out for
- The hyperbreak has to be timed.
such that it kills the attack. You want to make sure that the hyper break ends the spell-card you are currently facing. Often times you may end uo breaking it too late (not saving time) or breaking it too early forcing you to finish an attack without a hyper active, which is slower. - The hyper break has to be timed such that it deals the most damage as possible.
- You may be at risk of an annoying glitch that instantly kills you, losing up to 2 entire seconds (this can be avoided by not manually breaking the hyper, but instead by getting hit).
- You need to hyper break in time. Sometimes, you only have 3 [match=Wolf] tokens in the hyper. This results in a [match=Wolf] hyper that lasts for a very short duration. If you manually hyper break too late, you will use a bomb and you will have to wait out 5 seconds before being able to attack again.
Excellent Youmu positioning
Advanced
Youmu deals a different amount of damage depending on her horizontal and vertical position
For her horizontal position, you want to make sure to alwayd be straight below the boss. Being to the side of the boss deals reduced damage.
Her vertical position is more complicated.
- You want to be up-close. This has to do with the fact the early slashes of Youmu deal more damage than her later slashs.
- You want to make sure Youmu's slashes hit Saki for as long as possible. This is difficult to optimise for, because Youmu's slashes actually move upward by 1 unit per frame.
After a bunch of experimenting, I found the sweet spot that allows for speedkills. Here it is:
A visual indicator is that the top of Youmu's options touchthe bottom of the HP ring.
This not only works with Youmu's main shot, but it works if Youmu hss her [match=Wolf] hyper active too !
Other
A hyper can be manually broken with the X button. However, there exists an annoying glitch with it. If the player breaks their hyper whilst the player is hit by an enemy/bullet, the player instantly dies. This is very annoying as dying costs time.
Now it's time for the route
This section talks about resources.
Lives aren't important in EBaWC Ex speedrunning: you only want to die once, but dying multiple times (and even dying to the boss) is fine. Furthermore, suicides don't save any time so there's no need for lives.
On the other hand, bombs are most important aspect of the run. It is just barely possible to bomb all of Saki's attacks without the need to die during the fight !
Beginner:
When beginning, the whole token juggling is very difficult to grasp, and remembering the route while you are doing all the speedkills and bombing is also hard to do at first. Since this section is devoted to beginners, I recommend dying only if you have 0 bombs left
Intermediate/advanced:
Before entering the mid-boss, pick up a bomb token. When you exit the mid-boss, you want to make sure you are exiting with strictly less than 2 bombs ! This is because during the stage you want to die to refill bombs. After that you want to avoid dying and you want to make sure no bomb token despawns.
Beginner/Intermediate/advanced:
Collect 3 [match=Eagle] tokens and 1 bomb token. Preferably don't die so that you have 4 power entering the boss.
[Midboss kutaka (long)]
Beginner/Intermediate:
Spend one bomb on each attack of Kutaka. After you used your third bomb, activate the egle hyper and shotgun her.
Advanced:
Bomb her first spell-card. The time it takes should be between 4.10s-5.00s
Bomb before her second spell-card starts. Then, right after the bomb pick up a token to activate an [match=Eagle] hyper. Time should be around 2.80s-3.50s.
When the second spell-card ends, break your hyper if you haven't already. If possible, prepare for an [match=Eagle] hyper while also spamming X to bomb her third spell-card. If possible, right after the bomb pick up a token to activate an [match=Eagle] hyper. Time should be around 2.80s-4.50s. Note that this hyper is the hardest one to get in the entire stage considering you have less than 3 seconds to activate it starting from 0 tokens while also having to consider bombing and potentially using a double [match=Eagle] hyper on the attack.
Beginner/Intermediate:
Suicide once to refill your bombs. If you collected strictly more than 2 bomb pieces durung Kutaka after the suicide then it is not a big deal.
During the stage make sure to kill enough enemies for enough tokens on-screeen. Also, I recommend to activate a neutral hyper consisting of mostly bomb tokens. This ensures no bomb tokens despawn during the Saki fight. Also, before the boss prepare for a [match=Wolf] hyper. I recommend getting 4 [match=Wolf] tokens, but 3 is also fine.
Advanced:
Suicide once to refill your bombs. If you collected strictly more than 2 bomb pieces durung Kutaka after the suicide then you should reset, because then during the Saki fight you will have to suicide, costing time.
During the stage make sure to kill enough enemies for enough tokens on-screeen. Also, I recommend to activate a neutral hyper consisting of mostly bomb tokens. This ensures no bomb tokens despawn during the Saki fight. Also, before the boss spawms prepare for a [match=Wolf] hyper. I recommend only getting 3 [match=Wolf] tokens.
Beginner/Intermediate/Advanced:
Be at the bottom of the screen. Shoot her unfocussed only: there is no need to slash. [5.00s]
Beginner/Intermediate:
Activate the [match=Wolf] hyper. Dodge the bullets that are approaching you by being low. Please do not focus on dodging any tokens: just collect them, even if that means collecting 10 tokens during the spell. [8.00s-12.00s]
Advanced:
Activate the [match=Wolf] hyper. You want to be aggressive on the spell and move up as much as possible. Please do not focus on dodging any tokens: just collect them if they are in your way. [6.50s-8.00s]
Beginner/Intermediate:
Bomb. Go around the screen collecting 4 [match=Wolf] tokens in preparation for Spell 2. While you are collecting the tokens, also damage Saki. [6.00s-7.00s]
Advanced:
Bomb. Collect 3 [match=Wolf] tokens in preparation for Spell 2. Also deal damage to Saki [5.20s-6.00s]
In my opinion, this is the most annoying section of the entire stage.
Beginner/Intermediate:
Activate the [match=Wolf] hyper. Dodge at the bottom. If you get hit, don't panic and just finish it off by slashing. [9.00s-14.00s]
Advanced:
Activate the [match=Wolf] hyper. Dodge th attack up-close. If you get hit, don't panic and finish it off normally. [7.00s-9.00s]
Beginner:
Bomb. Prepare a [match=Wolf] hyper. Damage the non in the meantime as well [6.00s-7.00s]
Intermediate/Advanced:
Bomb. Prepare an [match=Eagle] hyper. Damage the non in the meantime as well. [5.30s-7.00s]
Beginner:
Activate the [match=Wolf] hyper. If your hyper runs out, then slash it until it dies [8.00s-10.00s]
Intermediate:
Acrivate the [match=Eagle] hyper. If your hyper runs out, then slash it until it dies. [7.50s-9.00s]
Advanced:
Activate the [match=Eagle] hyper. Before the hyper runs out, intentionally break it. [6.30s-7.00s]
Beginner/Intermediate:
Bomb. Prepare a [match=Wolf] hyper. Deal damage to the non-spell. [6.00s-7.00s]
Advanced:
Bomb. Prepare an [match=Eagle] hyper. Deal damage to non-spell. [5.30s-6.00s]
Beginner/Intermediate:
Activate the [match=Wolf] hyper. Dodge it at the bottom. [8.00s-11.00s]
Advanced:
This is a little more tricky. Essentially, you want to shotgun Saki at all costs. Luckily, the first two rings are static: the first ring aimst straight down, and the second ring is rotated in a way such that there is a gap below Saki. You only have to dodge the first wave and then you can comfortably sit below Saki on the 2nd wave. Right before Saki shoots her 3rd wave, try dodging the 1st ring that's coming back to you. If you get hit, finish it off with a slash. If you don't get hit, do a hyper break and finish it off. [6.30s-7.00s]
Beginner:
Bomb. Prepare a [match=Wolf] hyper. Deal damage to non. [6.00s-7.00s]
Intermediate/Advanced:
Bomb. If it seems like there are a lot of tokens on-screen (like 8 or more), then prepare for a neutral hyper. If not, then you can choose to either dodge the tokens or prepare for a [match=Wolf] hyper for Spell 6. In the meantime, deal damage to non. [5.30s-6.50s]
Saki moves depending on the player's position and angle, and her own position. This means you can manipulate her movement.
Beginner:
Activate the [match=Wolf] hyper. After she first moves and eventually stops, hug the side she is on. Then, don't move with her, but keep hugging the side she is on.
For example, if Saki moves to the left after the first wave, then keep hugging the left side of the screen. If Saki then does her 2nd wave, keep hugging the left side of the wall: she will bounce toward you. Make sure to dodge Saki too or she will kill you. lol [9.00s-14.00s]
Intermediate/Advanced:
In order to speedkill her, you must carefully manipulate her movement.
Firstly, you must stay directly below Saki. You first slash twice. She then bounces either to the left or to the right depending on where you are laterally. It is important to not follow her during the first wave, but to instead manipulate her movement. Right before she bounces on the wall, make sure to be at the same height Saki is at. This ensures she will stay high on-screen (note: if Saki is too low then on the 2nd wave she moves upward instead of downward, which is a major issue). Once she stops, you slash her exactly once again.
Secondly, on the 2nd wave you want to manipulate her movement such that she bounces off the bottom of the screen. You want to stay at roughly the half of the screen's height when she is bouncing. During the time, you want to charge your slash. When Saki bounces upward, preferably you want her to be at a slight angle going upward, and not straight perpendicular. As she moves up, you want to release your charge and slash her. Youmu's slashes each spawn at a different height. Usuaally there are slashes that are guaranteed to miss Saki because they spawn too low/high relative to Saki. However, in this case the slashes spawn as Saki moves up. This means each slash will deal damage to Saki, dealing the most damage a slash will do. [6.50s-7.20s]
Beginner/Intermediate:
Bomb. Go around the screen collecting 4 [match=Wolf] tokens in preparation for Spell 6. While you are collecting the tokens, also damage Saki. [6.00s-7.00s]
Advanced:
Bomb. Collect 3 [match=Wolf] tokens in preparation for Spell 6. Also deal damage to Saki [5.20s-6.00s]
Beginner/Intermediate:
Activate the [match=Wolf] hyper. Stay low on-screen so that you won't get hit. If the hyper runs out, just finish it off by slashing her. [8.50s-11.00s]
Advanced:
Activate the [match=Wolf] hyper. Try to go as high as possible while also dodging the bullets. [6.50s-8.50s]
Beginner/Intermediate/Advanced:
Bomb. Collect 3 [match=Wolf] tokens to prepare for Spell 7. Deal damage to the non-spell. [5.30s-7.00s]
Beginner/Intermediate:
Activate the [match=Wolf] hyper. Dodge it at the bottom to ensure survivability. Dodge if you can - I can't blame you if you get hit on this spell. xP
Deal damage until your hyper is broken/runs out [9.00s-12.00s]
Advanced:
Activate the [match=Wolf] hyper. Try to dodge it as high as possible. If possible, survive the jelly bean wave and then break your hyper. [6.50s-9.00s]
Beginner/Intermediate:
Bomb. Go around the screen collecting 5 [match=Wolf] tokens in preparation for Spell 8. While you are collecting the tokens, also damage Saki. [6.50s-7.50s]
Advanced:
Bomb. Collect 4 [match=Wolf] tokens in preparation for Spell 8. Also deal damage to Saki [5.20s-6.50s]
On this spell Saki has a lot of HP but luckily she also has a larger hitbox.
Beginner/Intermediate:
Stay around the middle of the screen. If there are any bomb tokens then deliberately collect them during the spell.Make sure to avoid getting hit. If you get hit then the spell becomes much harder to do. [12.00s-20.00s]
Advanced:
Stay right below Saki. If there are any lingering bomb tokens, collect them during the spell. Avoid getting hit. [11.00s-12.00s]
Beginner:
Bomb. Activate either a [match=Wolf] or an [match=Eagle] hyper in preparation for spell 9.
Intermediate:
Bomb. Activate an [match=Eagle] hyper in preparation for spell 9.
Advanced:
Bomb. Prepare an [match=Eagle] hyper in preparation for spell 9. Also, if possible manipulate a token such that the token is close to Saki right before Spell 9 starts.
Beginner:
Wait for the bomb to have worn off, then slash until your [match=Wolf] hyper runs out. [11.00s]
Intermediate:
Wait for the bomb to have worn off, then shotgun her until your hyper runs out. [10.00s]
Advanced:
Wait for the bomb to have worn off. In the meantime, charge your shot while being on top of Saki. Once the bomb wears off, release your shot and collect a token as soon as possible to trigger a double [match=Eagle] hyper. Shotgun her. When Saki's HP bar is 1/4, wait exactly one second then break your hyper for the extra slashes [8.50s-9.00s]
Beginner:
Prepare a [match=Wolf] hyper, preferably one that lasts the longest.
Intermediate:
Prepare an [match=Eagle] hyper. A few seconds after Spell 9 has ended, use a bomb.
Advanced:
Prepare an [match=Eagle] hyper. Charge your shot.
Beginner:
Use the [match=Wolf] hyper on her until it runs out. Then, slash the spell for the rest of the duration. [40.00s-48.00s]
Intermediate:
Saki gains a hitbox during the spell 90 frames after the spell starts despite Extra bosses usually being immune to bombs. During the first two seconds, activate your [match=Eagle] hyper. Shotgun Saki until your hyper gets broken by getting hit. Then, slash the spell for the rest of the duration. [30.00s-36.00s]
Advanced:
Firstly, slash Saki sith your normal shot. Then wait for a tiny bit. Essentially, the first slash plus the waiting time should equal to about 60f-89f. Then, you want to use a bomb during that time frame. Saki gains a hitbox during the spell 90 frames after the spell starts despite Extra bosses usually being immune to bombs. This trick is harder to do due to the timing, but it allows Saki to take more damage. Activate your [match=Eagle] hyper after the bomb, and shotgun her until your hyper gets broken. Her HP bar should be around 1/2 the way down. Then, slash the rest of the spell until she is dead. [23.00s-28.00s]
livesplit
thinput
[Special thanks]
u