Mountain of Faith - Extra RTA guide
Author: Nylilsa
This guide focuses on speedrunning the Extra stage of Mountain of Faith/MoF.
Furthermore, this guides assumes you know the basics of the game, such as but not limited to the controls, game's objectives, bombing/dying and the game's items.
By the end of the guide I hope you have learnt enough to get a sub 6m40s run !
MarisaB is the best shottype in MoF for speedrunning. This has to do with a glitch in which she deals about 8 times more damage than intentionally when her power is in the interval 3.00-3.95. Therefore, this guide focuses on speedrunning as MarisaB.
Also, 3.00-3.95 power MarisaB will occasionally be referred to as 3 power MarisaB for simplicity.
Mountain of Faith uses a system in which power is needed to activate a bomb. This is important, because the route is precisely done so that the player has enough power to bomb and enter the next attack with 3 power.
There are two segments in which the player can save time: the mid-boss and the main boss.
You need to enter the mid-boss with exactly 4.95 power or 3.95 power. It has to do with the amount of power Kanako drops after her 1st and 2nd mid-spell. If you enter with less power, it means you won't be able to bomb certain attacks meaning you lose time.
If you are a beginner, then you shouldn't worry too much about entering with the right amount of power. Just bomb whenever you have 4 or 5 power until you have 3 power left. Then hold Z until Kanako dies. If you see yourself in a situation where you only have 2 power, you can suicide. You will get exactly 3.20 power in return, so you can always do the glitch ! Just get familiar with using MarisaB, and if you are enjoying destroying everything in your path, then maybe consider doing the intermediate or advanced routes provided below !
If you are intermediate, then you need to enter with 4.95 power. Then, bomb the mid-non-spell. Capture the 1st mid-spell, bomb the 2nd mid-spell, bomb the 3rd-mid-spell.
The bomb on the 2nd mid-spell must be done when the timer is reaching the 65 second mark in the top right. Kanako is invincible for the first few seconds.
In summary,
| Segment | Actions |
|---|---|
| mid-non-spell-1 | Bomb |
| mid-spell-1 | Capture spell |
| mid-spell-2 | Bomb |
| mid-spell-3 | Bomb |
If you are more advanced, you can bomb right before Kanako appears. Kanako then takes damage during dialogue, which means she takes damage on the mid-non-spell. Capture the 1st mid-spell, bomb the 2nd mid-spell, bomb the 3rd-mid-spell.
In summary,
| Segment | Actions |
|---|---|
| right before Kanako spawns | Bomb |
| dialogue | Do nothing |
| mid-non-spell 1 | Attack normally |
| mid-spell 1 | Capture spell |
| mid-spell 2 | Bomb |
| mid-spell 3 | Bomb |
Enter the boss with exactly 4.95 power. Again, this has to do with the number of power Suwako drops after every attack.
If you are a beginner, it may be very challenging to enter with exactly 4.95 power, so just enter with whatever you are comfortable with. Just bomb whenever you have 4 or 5 power until you have 3 power left. Then hold Z until Suwako dies. If you see yourself in a situation where you only have 2 power, you can suicide. You will get exactly 3.20 power in return, so you can always do the glitch ! Again, just get familiar with using MarisaB, and if you are enjoying destroying everything in your path, then maybe consider doing the intermediate or advanced routes provided below !
If you are intermediate, then I definitely recommend entering with 4.95 power. The main principle goes as follows: bomb every non-spell except for the 4th and 6th non-spell and capture every spell-card. There are a couple of remarks on certain attacks:
Spell 3 can be hard to do because the bullets will be in your way. There are two things you can do: first option is to die and use your invincibility frames (or i-frames for short) to finish the attack. The second is to misdirect the bullets upward by using your i-frames from your previous bomb. The latter is very hard to do, though.
On non-spell 4, the boss is not dropping enough power, so you cannot bomb there.
On non-spell 6, the boss is dropping 2.05 power, which is too much so you cannot bomb. You also want to collect at least 0.50 power, because by collecting enough power that will allow you to bomb on non-spell 7. You want to collect just a bit of power and not all of them.
On spell 9, once the spell ends, Suwako drops 3.00 power. If you don't want that power to be in your way, I recommend depleting all your bombs right before the survival ends. This way when you enter the final spell-card you will have 3 power instead of 4 or 5 power.
In summary,
| Segment | Actions |
|---|---|
| non-spell 1 | Bomb |
| spell 1 | Attack normally |
| non-spell 2 | Bomb |
| spell 2 | Attack normally |
| non-spell 3 | Bomb |
| spell 3 | Attack normally or die |
| non-spell 4 | Attack normally |
| spell 4 | Attack normally |
| non-spell 5 | Bomb |
| spell 5 | Attack normally |
| non-spell 6 | Attack normally, exit with at least 3.50 power |
| spell 6 | Attack normally |
| non-spell 7 | Bomb |
| spell 7 | Attack normally |
| non-spell 8 | Bomb |
| spell 8 | Endure |
| spell 9 | Endure, exit with 0 power |
| spell 10 | Attack normally |
If you are more advanced, then you have to enter with 4.95 power. The route is similar to the intermediate route, but it varies in some aspects.
Firstly, right before the boss there are three yellow fairies. Those fairies drop 1.00 power when killed. It is possible to bomb right before the boss appears. With a well-timed bomb you are able to enter with 4.95 power and also deal some damage to Suwako during the dialogue ! But the timing is tight. Personally, I use the background music to determine when I have to bomb. However, this may vary depending on the consistency of your mid-boss section. Also, practising with a music cue in Practice Mode may not be very nice to work with because the music doesn't align.

The image above compares the HP if a pre-bomb is done vs if a pre-bomb is not done.
On spell 3, you have to misdirect at least two of the "rings" Suwako shoots. Those rings are aimed at the player. The best way to juke them is to sit slightly on top of Suwako's head until she has shot 2 of those rings.

In the image, you can see that Marisa is slightly above the bullets Suwako spawns. Doing this for two waves is enough to misdirect enough bullets to the top.
Everything else is from the intermediate route.
| Segment | Actions |
|---|---|
| right before Suwako spawns | Bomb |
| dialogue | Press ctrl |
| non-spell 1 | Bomb |
| spell 1 | Attack normally |
| non-spell 2 | Bomb |
| spell 2 | Attack normally |
| non-spell 3 | Bomb |
| spell 3 | Attack normally |
| non-spell 4 | Attack normally |
| spell 4 | Attack normally |
| non-spell 5 | Bomb |
| spell 5 | Attack normally |
| non-spell 6 | Attack normally, exit with at least 3.50 power |
| spell 6 | Attack normally |
| non-spell 7 | Bomb |
| spell 7 | Attack normally |
| non-spell 8 | Bomb |
| spell 8 | Endure, |
| spell 9 | Endure, exit with 0 power |
| spell 10 | Attack normally |
This section is meant for if you are an advanced player. These tricks described below may help you save about 2-3 seconds off of your current run if you haven't done them yet.
The doppler-effect strategy is very simple. You need to be at the bottom of the screen when the attack starts, then move upward when the boss is able to take damage.
When shooting, the bullets are fired at a constant rate. Also, the bullets do not instantly hit the boss - they need some time to travel from the player to the enemy. You can manipulate how much damage per second your player character deals. If you move upward while shooting, there are more missiles hitting the boss per second so the Damage Per Second output is greater. If you move downward while shooting, the Damage Per Second output is lesser. This is greatly applied in MoF RTA.
When the boss is able to take damage, you can move upward as that will finish the attack slightly faster by a couple of frames per attack. During the transition (so the time between the non-spell and spell, or spell and non-spell) the boss is usually invincible for about a second or sometimes more. In the period the boss isn't taking any damage, you have to move down as that will allow you to do the doppler strategy again for the subsequent attack.
The normal-alignment strategy is a lot harder to do more. It involves being exactly in the middle of the screen, at the coordinate x = 0. When you are hitting a boss, some of your lasers may be orange-coloured. If they are coloured, it means that the lasers are dealing damage to the boss. Most of the time only 2 out of 3 lasers hit the boss. But with the normal-alignment strategy it is possible for 3 out of 3 lasers to deal damage.
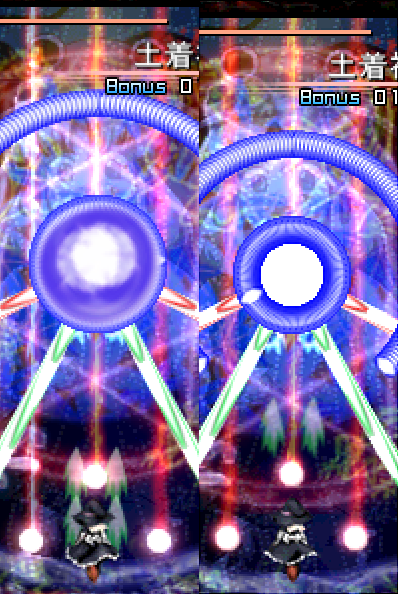
On the left of the image, only 2 out of 3 lasers hit the boss, and on the right side 3 out of 3 lasers hit the boss.
This can be done in various ways:
By dying
By going all the way to the left of the screen. Then, while focussed, move for two frames to the right. Then while unfocussed, move to the right until you are exactly in the centre.
By going all the way to the right of the screen. Then, while focussed, move for two frames to the left. Then while unfocussed, move to the left until you are exactly in the centre.
(Note: you move at 5 units/frame when unfocused, and 2 units/frame when focused when moving vertically or horizontally. The left/right side are at x = -184 and x = 184 respectively hence moving 2 frames while focussed)
MoF extra gives the player enough lives, so there is no need to do 2 and 3. You can always suicide right before a certain boss section in order to be normally aligned.
Now here comes the hard part: moving around.
Since you want to be at x = 0 as much as possible, you have to make sure to NEVER move diagonally. It may sound easy to never move diagonally, but if you ever want to travel in a square very quickly you may find yourself accidentally moving diagonally for a frame or two when switching from vertical to horizontal movement (or vice versa). By moving diagonally, you are moving at a non-integer x-velocity. meaning that you will have to move diagonally again in order to be normally-aligned again.
On top of this, the boss likes to move around as well, but once an attack ends the boss usually goes back to x = 0. This is important, because it means you can do the normal-alignment strategy again on the attack where the boss is exactly at x = 0.
Plus, you also have to be good at frame-perfect taps. Sometimes, you are only 5 units away from x = 0, meaning you have to move horizontally for 1 frame.
It's quite hard to do this strategy, especially when combined with the doppler-effect strategy, but it is worth it if you are going to optimise MoF Extra RTA.
livesplit - Used for keeping track of your time.
vpatch - Used for setting your own custom screen resolution when playing on non-full-screen mode.
thprac - Great Practice tool that allows you to warp to certain stage sections and to set your power.
mantatail for having written a guide about MoF RTA that made me speedrun the game.
ZUN for having made this game with such a fun and broken shottype.
…and you for having read through the entire guide !
Happy speedrunning !
- Nylilsa